Hiking With an Infant / Newborn Introduction
If you are a fan of the blog you may have noticed we have been a bit quite lately and have not posted as many trip reports recently. You may also know that we do a yearly Back Country Yosemite snowshoe trip each year which we didn't do this year. The reason was we just had our first kido in March! Once my wife got the thumbs up from our doctor to start hiking again we have been having a blast exploring local trails with our little one!
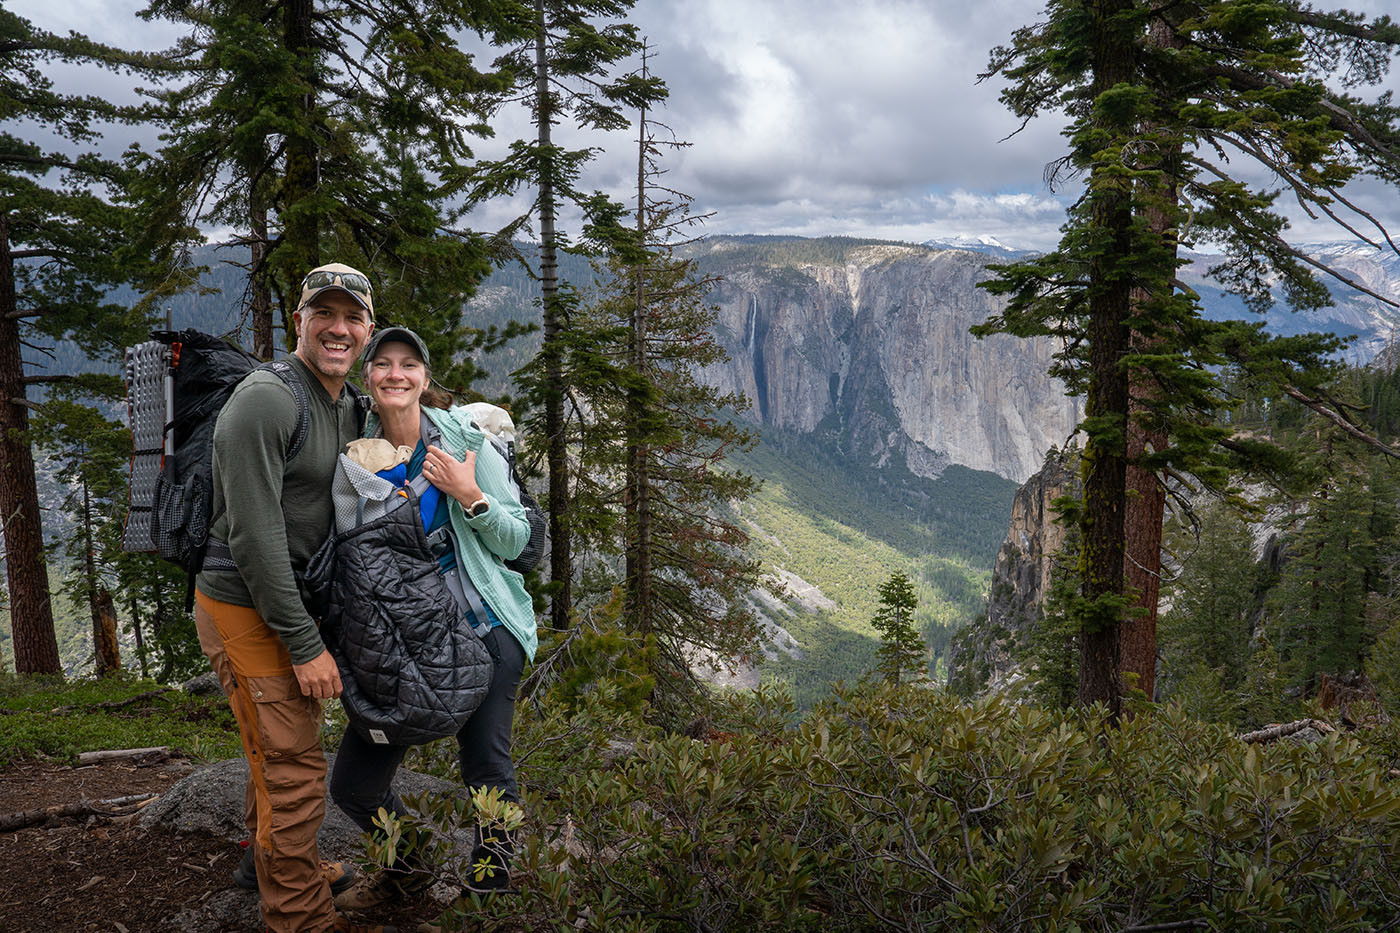
Since we were both on paternity / maternity leave for a few months bonding with our new family member we decided to try and squeeze in a road trip... definitely a stretch goal with a newborn. My wife and I are pretty adventurous and while pregnant we heard multiple times that we wouldn't be able to continue our adventurous lifestyle. Maybe I wanted a culminating event for Paternity leave, kind of like a test of our parenting skills thus far... Or maybe I just wanted to prove people wrong who said we would be stuck inside and never leave our apartment once we had kids. Either way we love road trips and exploring. We couldn't wait to share our love for National Parks with our little one. Since both my wife and I have busy jobs, there was no better time than now to take a last minute road trip to my favorite place on earth, Yosemite National Park!
Lets explore how we drove 8+ hours to Yosemite National Park and hiked over 3 days worth of trails totaling 18.42 miles and 4,199 ft of elevation gain with a 2 month old.
Road Trip With a New Born / Infant
Our longest drive before this trip with our little one was about an hour. Driving to Yosemite would be an over 8 hour drive for us from San Diego. We decided early on that we would not attempt the entire 8 hour drive in one day and instead break it up into two chunks and stop at a hotel on the way. Additionally we drive an electric car so we would have to stop and charge as well. Being forced to stop and charge was actually a blessing in disguise. Gave us and our kido a good break to get out of the car and walk around for a bit. I think he appreciated the charging stops a lot.
ℹ️ Pack smarter, not harder, with Don't Forget the Spoon. Our app simplifies trip planning with personalized gear lists, a community gear locker, pack weight statistics, and calorie tracking. Say goodbye to forgotten gear and hello to seamless planning for your next outdoor adventure
Our plan was to not book our hotel for the drive until we were on the road. We figured we could feel out how we and our little one were doing and then book something close by when he got tired. This was probably our first mistake of the trip. If I were to do it again, I would preselect and book our stopping point to force us to stop. Our little guy was doing so well in the car we pushed the drive further than we should have on our first day and made it all the way up to Oakhurst California just outside Yosemite National Park.
The last hour was a bit rough of a drive and our little guy lost it right when there was nowhere to stop for the night. We pulled over and my wife jumped in the back of the car to calm him while we played a lullaby I found on YouTube Music for an hour.
Book your stopping point ahead of time to force yourself to stop. If it's already booked you wont try to push further then you should! We were all pumped to make it to the hotel and our little man loved playing with his toys and getting some much needed tummy time in.

The other big road trip lesson learned was changing tables are not very common in restrooms as we drove to Yosemite. As new ignorant parents I just assumed good changing tables were everywhere... kind of like handicap parking just assumed there was some law that made them a thing. I was definitely wrong and was shocked to find that Starbucks and Jersey Mikes both didn't have changing tables.
We were lucky because the frunk of our EV actually ended up being a great on the go changing spot... But that was something that was a huge surprise for me while traveling. We did bring the Osprey Poco Changing Pad (Amazon Affiliate) with us which we did use on the ground once or twice in a pinch.
Newborn / Infant Road trip Tip Summary:
- Break long trips up into small chunks. Book your stopping points before you leave.
- Bring your own changing pad, most restrooms we encountered did not have changing tables. We recommend the Osprey Poco Changing Pad (Amazon Affiliate)
- Electric Car frunks could be a great possible changing table
Hotel Tips with a Newborn / Infant
Since we decided not to go camping on our first hiking road trip with our infant we stayed in 3 different hotels over the course of our trip. One on the way up, one in Yosemite National Park and then another on the way back home.
Similar to the car trip, hotels were not designed for babies. There was never a great place to change the baby in the hotel room. Don't forget to bring a good changing pad to lay your little on one! Check out our Packing mobile app Don't Forget The Spoon so you don't forget to pack everything.
An accidental tip we discovered was to get two queen beds instead of one king. We brought our own bassinet (More on this soon) and the baby obviously isn't going to go in a bed yet, so why the two beds? We normally book one king for us and honestly tried to do that for this trip, but with all the hotels being booked last minute they were always sold out of rooms with one King. So we settled for the two queens, and it kind of worked out great!
We basically had one bed for my wife and I to sleep in and then we used the second bed for us to play with the baby in the center. We did tummy time in the center of the bed and played with all our toys and read books there as well. It was like having one big couch to hang out on together. If you can find a hotel with a couch even better, but this worked great for us.
One other tip to look out for when booking rooms, is if you can book one with a small kitchen table. We had two rooms that had a small table and this worked out fantastic for eating meals. Most new parents know eating out of restaurants can be difficult, so being able to grab pick up or use a delivery service to the hotel, it's nice to be able to just dine in your room when traveling with a newborn.
Let's talk about sleep. Getting a newborn to sleep at night can be an interesting challenge and full of your own rituals, which may not be possible at a hotel. Our baby at the time was sleeping in a bassinet, and we were very fortunate to have gotten a travel bassinet at our baby shower. The travel bassinet we got is the Chicco LullaGo Anywhere LE Portable Bassinet (Amazon Affiliate). The bassinet packs down mostly flat and fit perfectly in our trunk. Our little one slept great in it!
Lets back up just a minute though, I got a little ahead of myself. Unless you are super lucky, placing your newborn directly into the bassinet before any bed time ritual won't probably work. Our bed time ritual at home included plenty of time in a rocking chair to gently rock our little guy to sleep right before we put him into the bassinet. Works great for us..... but most hotel rooms don't just have a rocking chair waiting for you to lull your baby to sleep in, and the sleep ritual is important.
Luckily being outdoorsy camping folks we had a fantastic travel rocking chair solution! One Christmas my wife purchased me the Nemo Star Gazing camping chair (Amazon Affiliate). Not great for backpacking, but fantastic for car camping, beach trips etc. Packs down small, and is easy to carry, and best of all it's a reclining rocking chair!
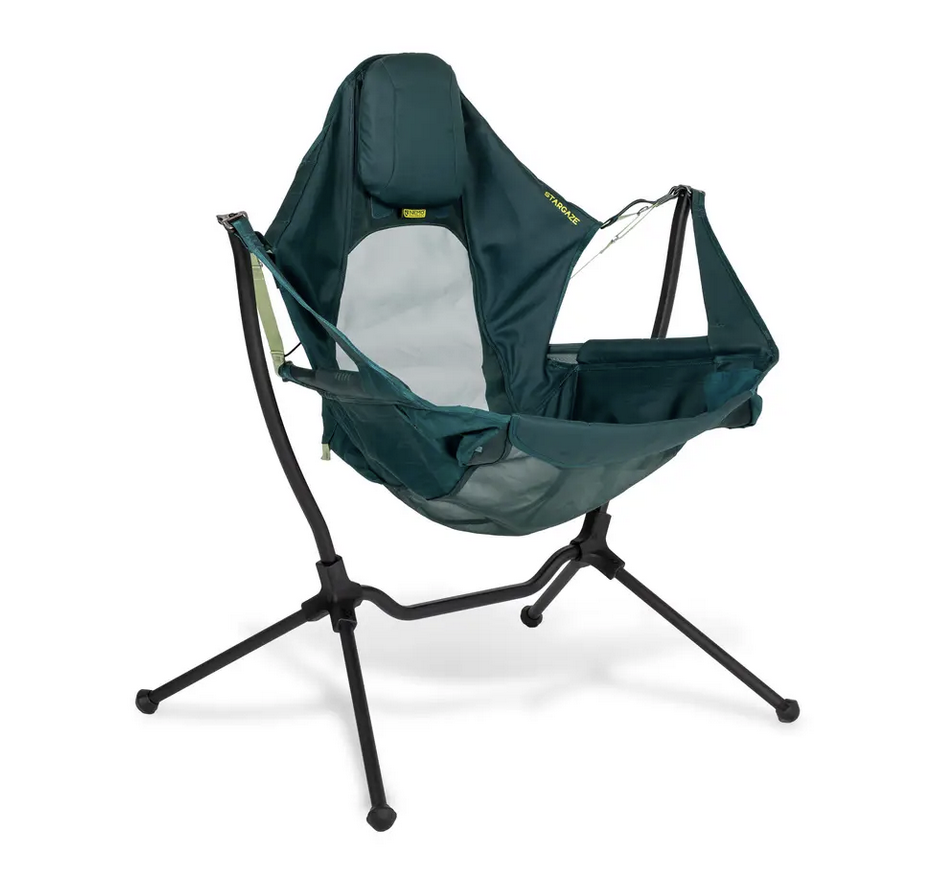
In our last hotel I left the Star Gazing camping chair in the car being confident that our little one was tired and would get to bed quickly.... I was dead wrong and was super happy that I could just set it up quickly and rock our newborn to sleep quickly in our hotel. If you rock your baby to sleep I would not travel without it.
Newborn / Infant Hotel Tip Summary:
Hiking with a Newborn / Infant Overview
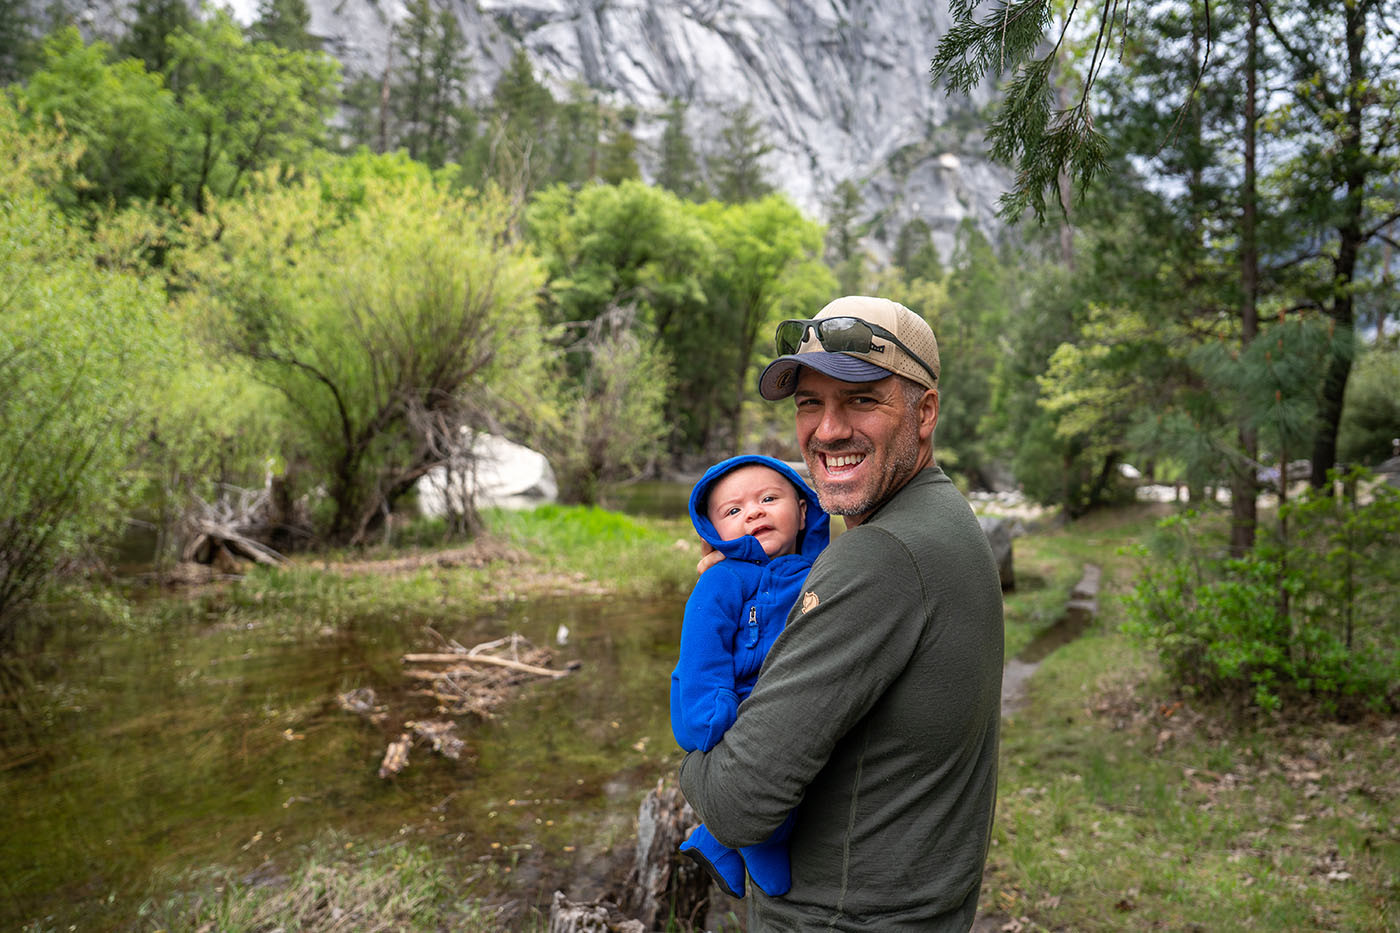
My wife and I go out hiking almost every weekend, and are happy that we can share this passion with our little one. Sometimes I think he sleeps better on the trail than he does back at home. We are only just about 3 months into this adventure of being parents so we are by no means experts but this is what works for us.
On this trip to Yosemite National Park with our newborn we did 3 decent hikes which I will have articles for each one in the near future:
- Mariposa Grove - 5.8 miles 1,000 ft of elevation gain.
- Tunnel View towards Stanford Point - 7.31 miles, 2,700 ft of elevation gain.
- Loop through Mirror Lake - 5.3 miles 300 ft of elevation gain.
But let's talk gear and strategy for the hikes. If you want to see our full gear load out you can check it out here to see what both my wife and I each carried to include our baby, his toys and our hiking gear.
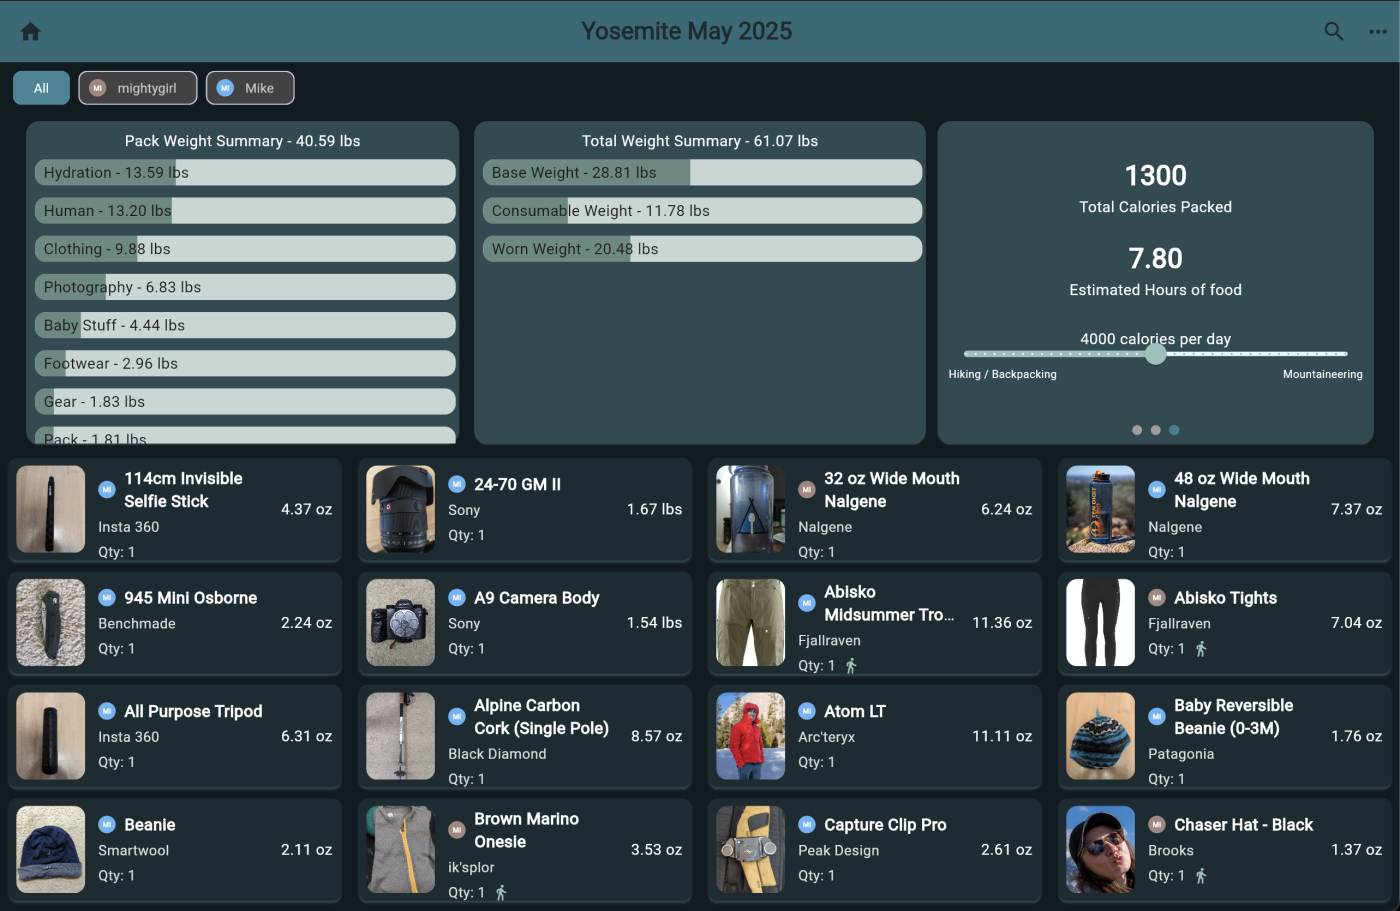
Between the two of us we carried about 40.9 lbs of gear. The live list of our gear allows you to click either of our usernames to see who carried what etc. I will call out some of the specifics for our little guy in a minute.
New Born Hiking Baby Carrier
There are a lot of different hiking carriers on the market from front carriers to full on backpacks that you can carry your little one. We have an Osprey Poco LT Lightweight Child Carrier Backpack (Amazon Affiliate) but have not had a chance to use it yet. Our little one needs to be a bit older before he can go in that one. He needs full head control first. So we were not able to test that out yet, but looking forward to the day.
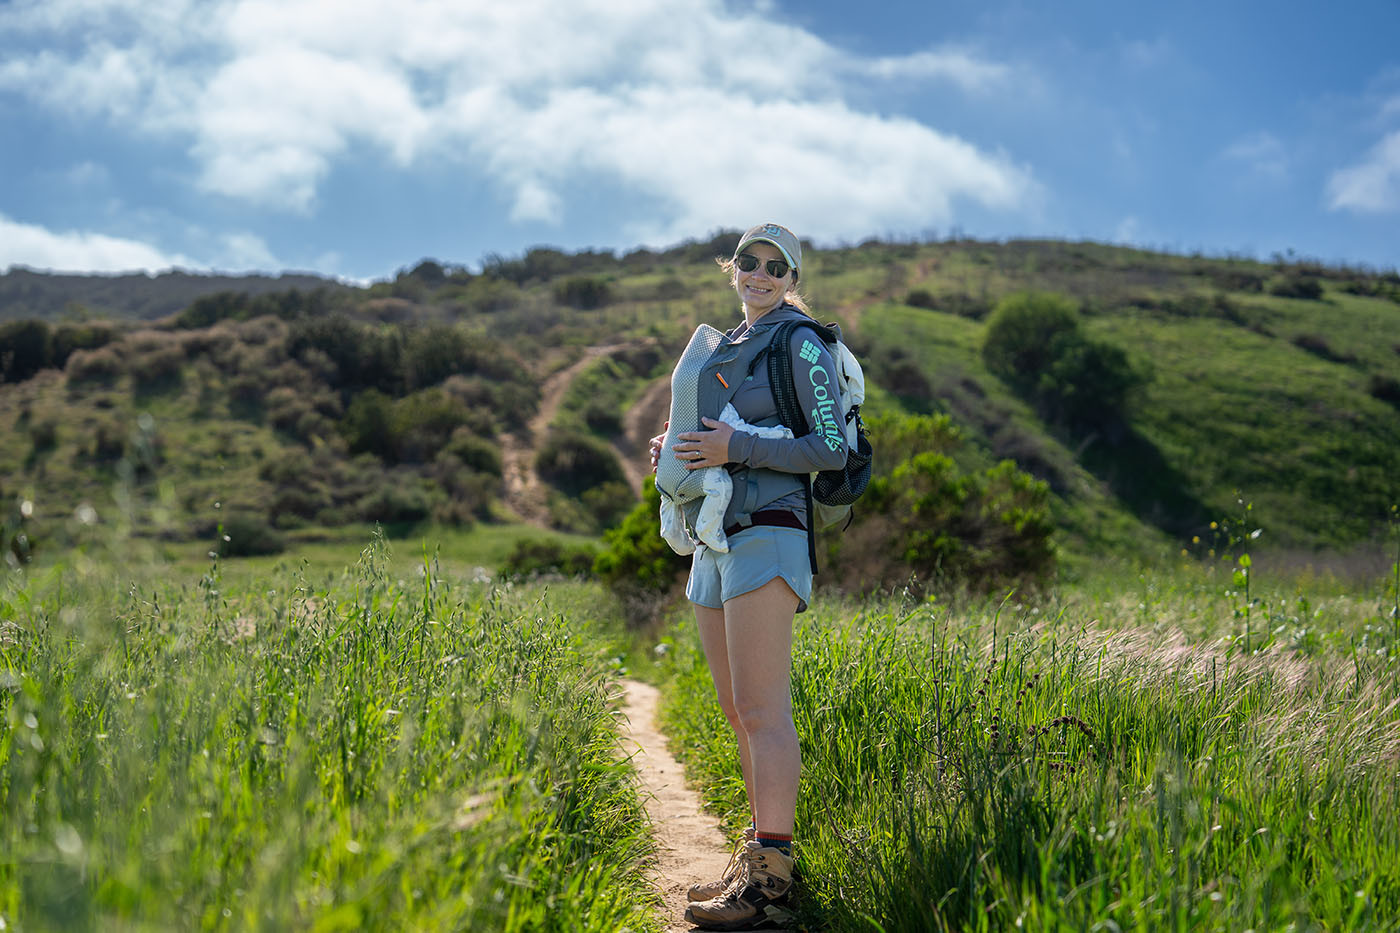
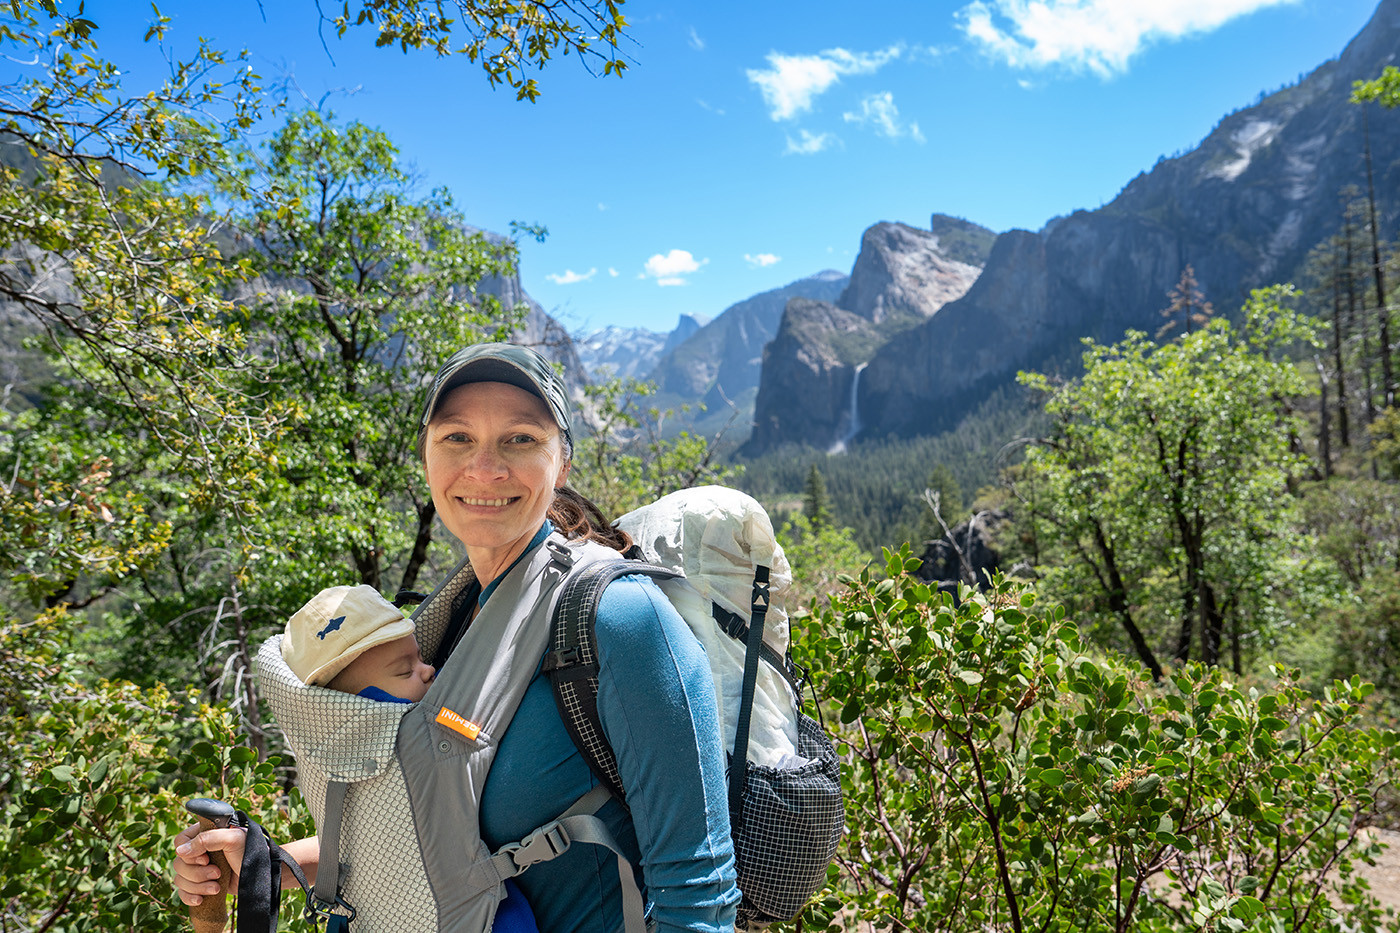
For all our hikes thus far we use a front carrier. One of the most popular front carriers is an Ergo 360, we tried it but weren't fans. Seemed a bit too industrial and heavy for us but we have a lot of friends who swear by theirs and love them. We tried that one but ultimately our favorite is the Mesh Beco Baby Carrier Gemini (Amazon Affiliate). If you can, I recommend trying both and see what works best for you and your baby.
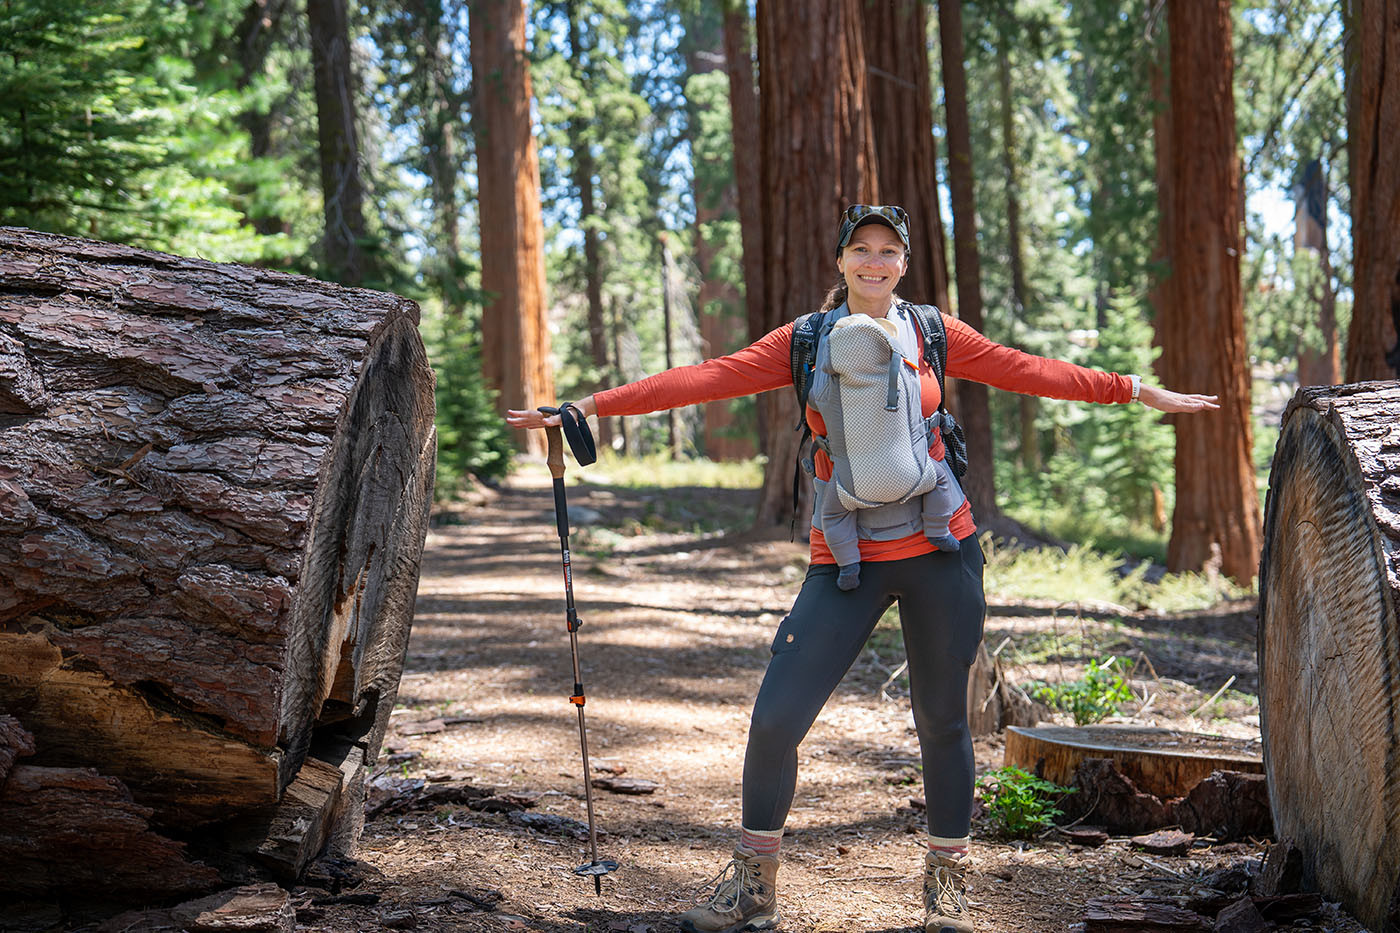
There are different versions of the Beco Baby Carrier Gemini, and we got the mesh one to use in hotter weather. If money was no object I would consider getting a second one that is not the breathable mesh for colder weather hiking. As we hiked up to 7,000 ft in elevation in Yosemite I was a little worried about the breeze coming through the mesh. To help mitigate this and add another layer of warmth in our packs for our baby we purchased the 7AM Enfant Baby Carrier Cover - K-Poncho (Amazon Affiliate). This straps over any baby carrier like a blanket to block the wind. It has a cinch-able toe box as well to cuddle their feet. This was really nice to have and strap on as it got a little colder out as we climbed in elevation. It was nice to throw over the baby carrier and not have to take him out and put on his puff coat.
New Born Hiking Baby Clothing Layering
Yosemite National Park, especially this time of year can have a range of temperatures. While my wife and I would be running hot as we were carrying weight and actually hiking, our little guy would be still and not working out. Cold temps were definitely a major concern and we planned a lot of layers. For our newborn we had a Merino Wool base layer, a fleece mid layer and puffy jacket and an extra poncho for our carrier.
For our little ones base layer, we tried two different brands on this trip. I am a huge fan of Merino Wool and pretty much don't hike in anything else as my base layer personally. Naturally I wanted to find a Merino wool base layer for my little one as well. I could go on and on about the benefits of Merino wool but that could probably be its own article. On the trail in a front baby carrier, I really wanted the quick drying and holding in heat while wet properties to keep my guy safe.
The first Merino Wool baby base layer we tried was the Iksplor baby adventure zippy. This one worked great, but was missing one feature for us to absolutely love it. It had hand cuffs, but did not have feet cuffs. I would have loved it if it had feet cuffs as well as a good base layer on his feet.
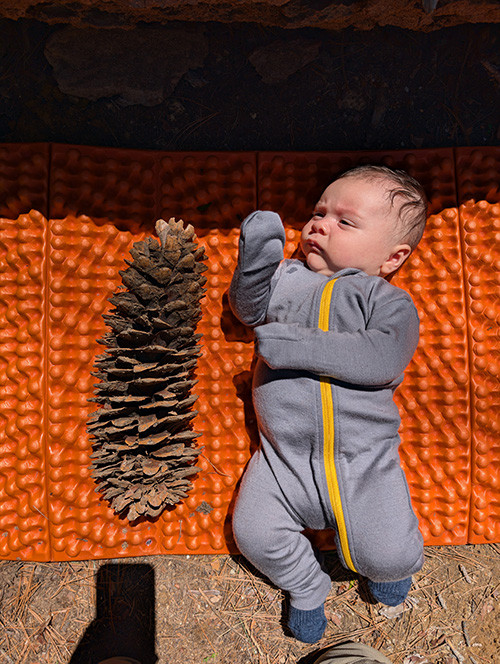
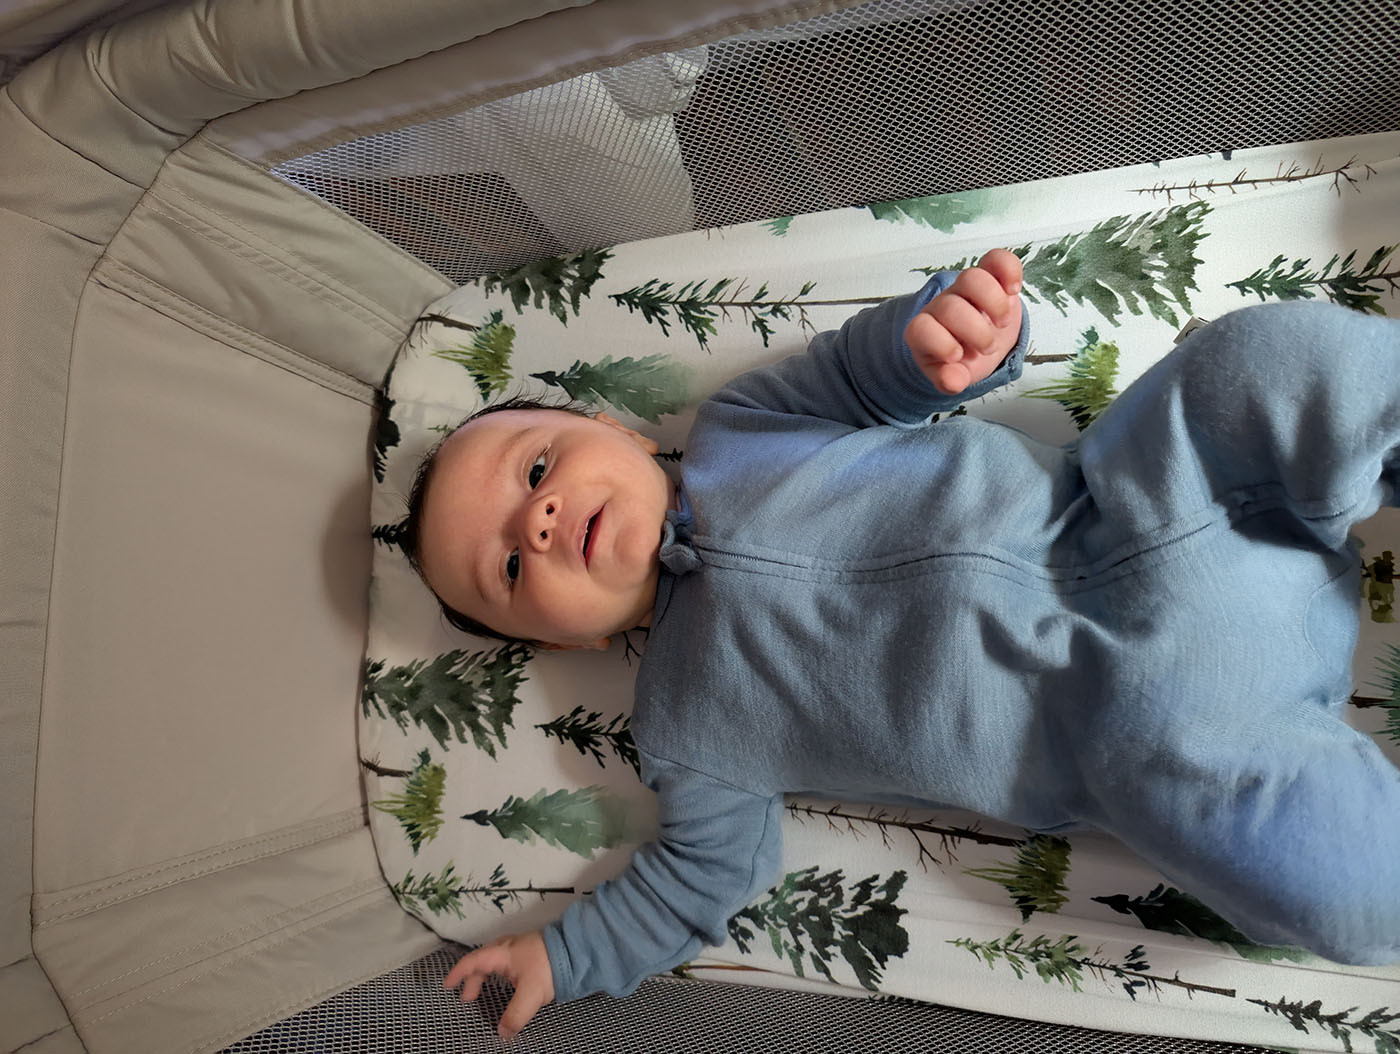
The second one we tried was a Woolino Toddler Footie Sleeper (Amazon Affiliate). This one actually felt much softer to the touch then the Iksplor one so might use a finer thread of Merino wool. Additionally it had both foot and hand cuffs which was great. Our little guy loved this one and we are planning to buy some more just for sleeping in at home as well. Unfortunately I don't have any pictures of him in this one on the trail because he had multiple layers over it. The earlier pictures of him doing tummy time in the Yosemite Valley Lodge hotel bed and the picture above of him in the bassinet feature this Wool Onesie in light blue.
For socks I didn't find any hardcore merino wool socks for infants, so I am open to recommendations if anyone has them. We just got these Woolino Wool Baby Socks (Amazon Affiliate) that looked more like dress socks than warm outdoor socks but it was another layer.
For a mid layer our friends let us borrow their Patagonia Micro D Bunting outfit, which was amazing. I would order one right this second but I cant seem to find it online, hoping it's just because it's out of season right now. The closest thing I could find right now is the North Face Glacier One (Amazon Affiliate). The Patagonia fleece was fantastic, it had both foot and hand cuffs, a two way zipper for trail diaper changes and a hood. Our little guy basically lived in this and his Merino wool base layer on the trail.
Since it's our baby and we didn't want to risk anything we did go full puffy for him as well as a bit of an emergency to keep in our pack. We chose the full Patagonia Hi-Loft Down Sweater Bunting - Infants. This thing looks super warm but it honestly didn't get cold enough for us to use it.... slightly disappointed I didn't get a picture of our little one in it though.
The last piece of clothing I will mention here is the booties we got. The socks I mentioned earlier were not super thick and I wanted more warmth for my little ones feet. One of our friends recommended the Zutano Unisex Fleece Baby Booties (Amazon Affiliate) and I couldn't be happier with them. We bought them a size up so we could fit them over our socks or feet cuffs from the merino wool base layer and they worked fantastic!
There were some other small little clothing items like a beanie we also brought but you can check out the other minor things in our full pack link. If you click the "Baby Stuff" category it will filter down just to the baby's gear.
Newborn / Infant Hiking Clothing Tips Summary:
- Merino Wool base layer is a must, we loved the Woolino Toddler Footie Sleeper (Amazon Affiliate)
- Fleece Base layer, we loved the Patagnia one we borrowed but I cant find a link for it. I recommend one with feet and hand cuffs and a hood.
- Puff coat as an emergency layer in our pack. We got the Patagonia Hi-Loft Down Sweater Bunting - Infants.
- Warm foot booties! We loved the Zutano Unisex Fleece Baby Booties (Amazon Affiliate).
- Don't forget a beanie to keep their head warm as well!
New Born Hiking Logistics and Miscellaneous Gear
Hiking with a newborn / infant is a big change and there are a lot of new planning factors and logistical challenges involved versus just hiking with my wife. The first one is a mindset change especially with regards to risk evaluation on the trail. Obviously with a newborn our tolerance for risk on the trail was greatly reduced. Being fit individuals who love the outdoors we love to push ourselves. Hiking with an infant I am not going to try and physically push myself to exhaustion then high five afterwards in congratulations. I always wanted a little extra gas in my reserves hiking with my little one just in case of emergency and so that my mind was clear to make smart decisions.
On our big hike, which was from Tunnel View to Stanford point, we got within less then a half mile of Stanford point and some epic views, but there was a stream crossing or a few feet deep. There were no good crossing points except a few sketchy rocks to balance on. If it was just my wife and I, we probably would have carefully crossed on the rocks or maybe looked for a fallen tree to climb across on. With a newborn that didn't even cross our mind. It was a tough hard hike up to that point and no one wanted to turn around before the goal, but we just shrugged and turned around.
Other logistical challenges are feedings and diaper changes. My wife is breastfeeding our little one so we did not have to deal with bottles which logistically simplified our trip a little bit. If you are an experienced baby hiker who uses formula we would love to have you share your tips below since we can't comment on that.
For our trips we set our Garmin Watches to sound an alarm every hour. Each hour we stopped and checked out our babies hands, feet, face etc. to see how he was doing temperature wise. We also wanted to get him out of the baby carrier to stretch and check his diaper. I think getting out and stretching every hour helped him stay relaxed and calm on the trail and he never got restless while we were on our longer hikes. Additionally while stopped we would feed him.
Now is a great time to mention pack extra onesies, we only had one "blow out" on the trail but it was a nasty one and we were so glad we had an extra outfit for him. Don't forget extra base layers for your little one! If you are like us and plan to stop every hour, have at least 1 diaper planned for each stop plus some extras.
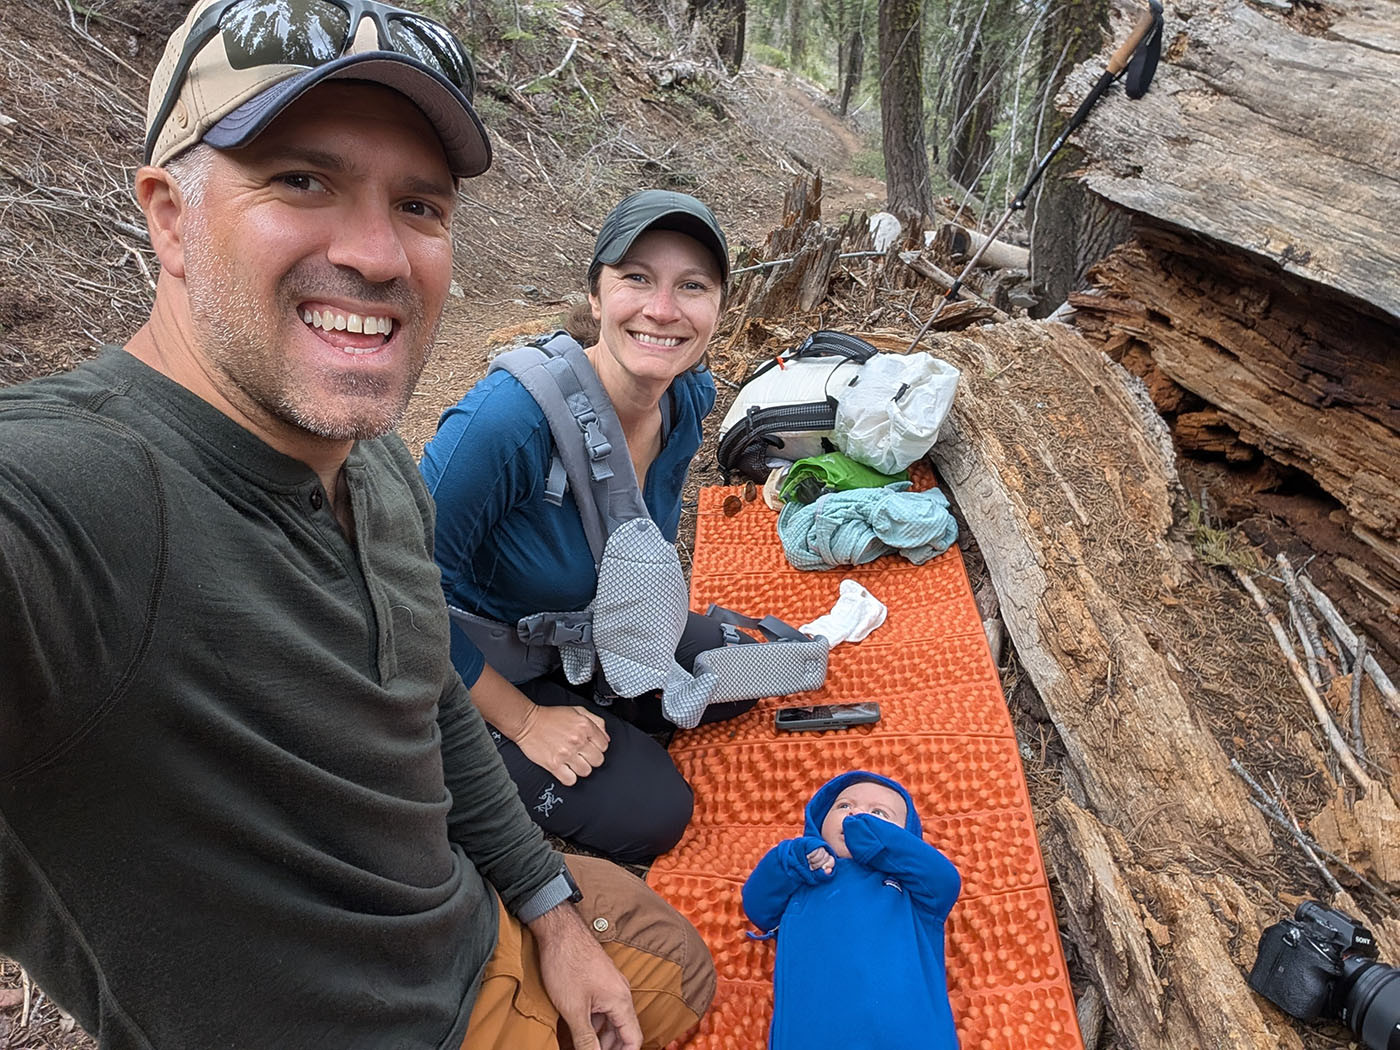
Let's talk about diaper changing. I mentioned while road tripping up to Yosemite we couldn't find any great changing tables on the way... well that was great training because there are no changing tables out on the trail! As much as we love our Osprey Poco Changing Pad (Amazon Affiliate) for every day out and about diaper changes we didn't bring it on the trail. Instead I packed my NEMO Equipment Switchback Foam Sleeping Pad (Amazon Affiliate). This was the star of the show for on the trail diaper changing. Its light weight, large and pretty dang comfy to lay on. Not only was it a great changing platform on the trail but it was great for my wife to sit on while feeding him as well. We even used it as a little play area for some trail side tummy time with his favorite stuffed dog Herald.
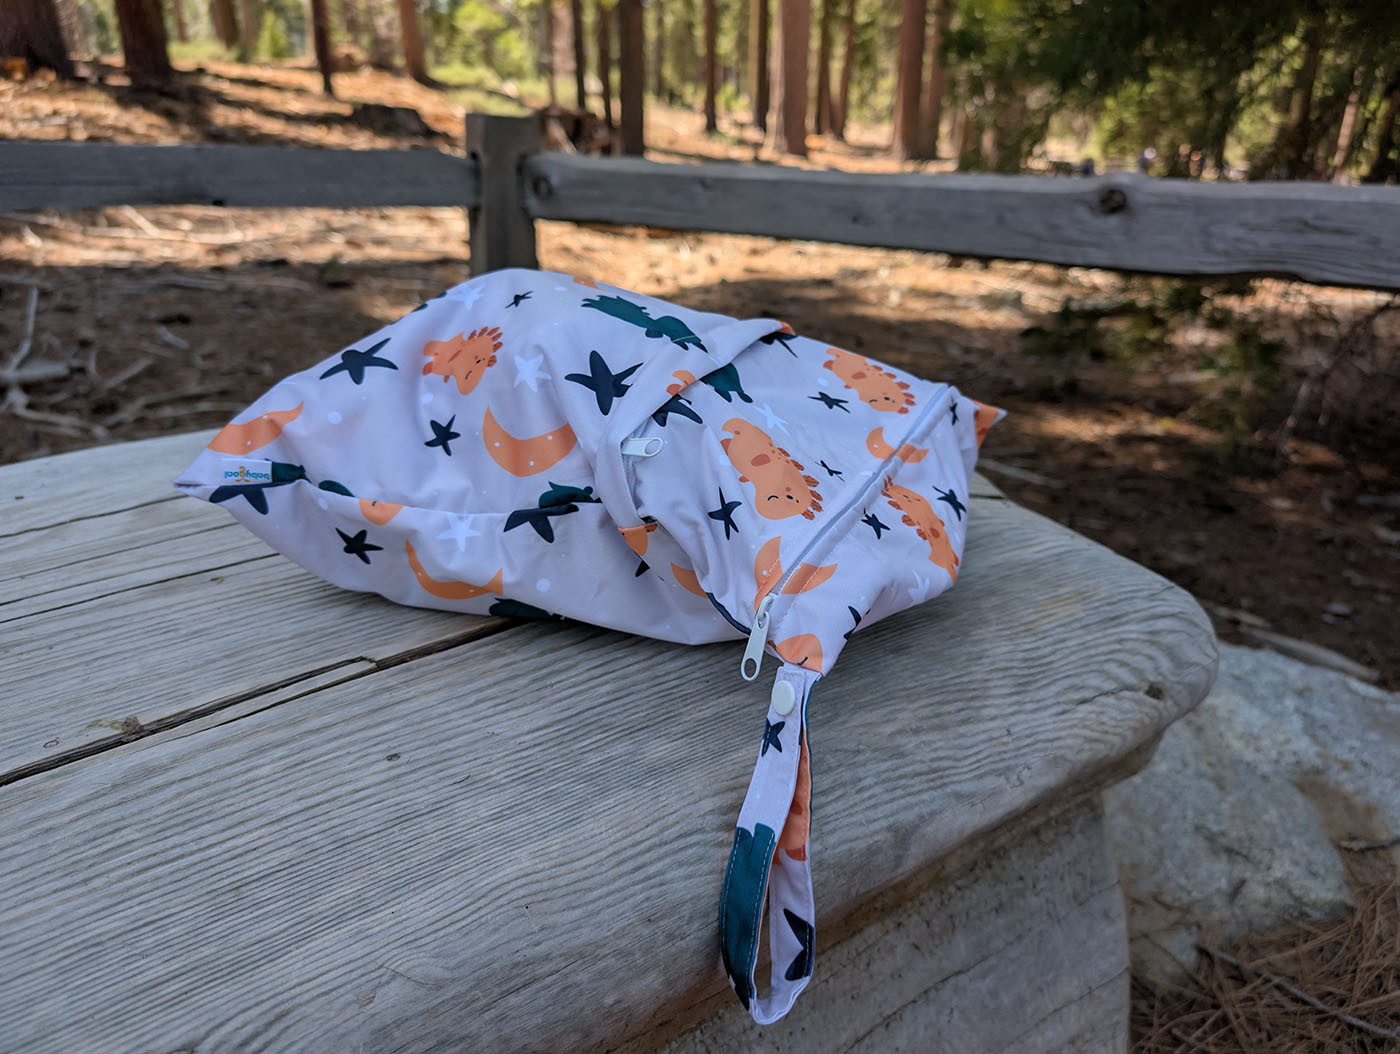
If you are a big time backpacker, carrying poop out in a Wag Bag (Amazon Affiliate) should be nothing new for you, so carrying diapers off the trail should be pretty painless. I don't know of any wag bags for small children so the best piece of gear we got recommended was the babygoal Wet Dry Bags (Amazon Affiliate). This bag has two compartments, one for clean stuff where we put all our clean diapers and baby wipes. Then in the second compartment we stored the dirty diapers to pack out. This Wet Dry bag system worked fantastic for us and I highly recommend them. We use these daily in our normal around town diaper bag as well.
The last pro tip for on the trail diaper changes is consider doing a little map work ahead of time to have potential diaper changing locations picked out. We didn't do this, and this is definitely a lesson learned for us. On our tougher hike there was a lot of steep trail which meant not a lot of flat areas to change and feed a baby. We had to push a bit past our hour goal for feedings and changing to find a safe place to sit with our little one. A few minutes of map work ahead of time and I could have marked out a couple potential flat spots for baby changing!
My last little gear tip for whoever is carrying the baby is hiking poles! You don't want to trip with your little one strapped to you, just bring and use some poles for better stability!
Newborn / Infant Hiking Logistics Tips Summary:
- Change your mindset, you aren't peak bagging and goal hunting here. Enjoy the time with your little one outdoors!
- Plan to stop every hour for diaper changes, and feedings. This adds a ton of time to your hike, you will be much slower with a little one.
- Lightweight sleeping pads make great changing pads on the side of the trail. We love the NEMO Equipment Switchback Foam Sleeping Pad (Amazon Affiliate).
- Pack out what you pack in, the babygoal Wet Dry Bags (Amazon Affiliate) are great for carrying both clean and dirty diapers!